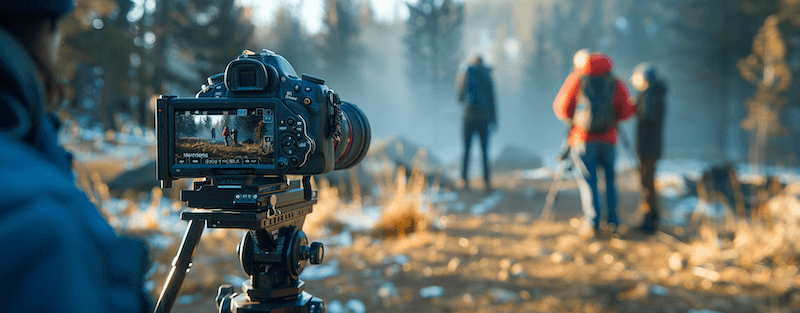
Creating cinematic videos is an art that combines technical skill with creative vision. Whether you're using a compact Sony camera or a high-end cinema camera, understanding and manipulating your camera settings is crucial for achieving that film-like quality in your videos. This guide dives deep into the essential camera settings and techniques to help you capture stunning cinematic footage.
Before you dive into the advanced features of your camera, it's crucial to get a solid understanding of the three pillars that form the foundation of every cinematic video: frame rate, shutter speed, and ISO. These settings are your primary tools for manipulating how your video looks and feels, affecting everything from motion blur and exposure to the overall sharpness and noise levels in your footage. Grasping these concepts will enable you to create videos that not only look professional but also evoke the desired emotions in your audience.
Frame rate, measured in frames per second (fps), is pivotal in defining the look and feel of your video. For a cinematic look, 24fps is the industry standard, mimicking the motion blur seen in most Hollywood films. However, if you're aiming for a slow-motion effect, shooting at higher frame rates like 60fps or even 120fps and then slowing down the footage in post-production can create a smooth, detailed slow-motion video.
Shutter speed controls the amount of time your camera's sensor is exposed to light. For cinematic videos, the 180-degree shutter rule is key. This rule suggests that your shutter speed should be double your frame rate. For example, if you're shooting at 24fps, set your shutter speed to 1/48s (or the nearest available setting, such as 1/50s on most cameras). This setting helps achieve the natural motion blur that contributes to the cinematic feel of your footage.
ISO determines your camera's sensitivity to light. Lower ISO values are preferable for maintaining image quality, with ISO 100-400 being ideal for daylight shooting. In low-light conditions, you might need to increase the ISO, but be wary of higher ISO levels, as they can introduce noise and degrade your image quality. Modern cameras, especially high-end cinema cameras and newer Sony models, offer impressive performance at higher ISOs, enabling cleaner shots in dim environments.

The depth of field and focus are powerful storytelling tools in filmmaking, allowing you to direct your audience's attention to where you want it. By mastering aperture settings and focus techniques, you can create a cinematic look that adds depth and dimension to your scenes. Whether you're looking to isolate your subject with a buttery smooth bokeh or maintain sharp focus across a vast landscape, understanding how to manipulate depth of field and focus is key to enhancing the visual appeal of your videos.
Aperture, measured in f-stops, influences the depth of field in your shots. A wider aperture (a lower f-stop number) allows more light to hit the sensor and creates a shallower depth of field, which is perfect for those out-of-focus backgrounds that make subjects stand out, akin to what you see in cinematic productions. Lenses with wider apertures (e.g., f/1.4, f/2.8) are highly sought after for achieving this effect.
Autofocus has come a long way, but for the utmost control and to avoid any focus hunting during critical moments, manual focus is the way to go. Using manual focus allows you to precisely control the focus point, crucial for creating dramatic focus pulls that are a staple in cinematic storytelling.
Color plays a pivotal role in setting the mood and atmosphere of your cinematic video. Through the use of color profiles and white balance, you can dramatically alter the look and feel of your footage. These settings allow you to capture more detail in a wide range of lighting conditions and provide a canvas for post-production color grading. By carefully selecting the right color profile and accurately setting the white balance, you can achieve a consistent, professional look that aligns with your creative vision.

Most cinema cameras and several high-end Sony cameras offer flat color profiles, such as S-Log or CineStyle. These profiles capture a wider dynamic range, retaining more details in the highlights and shadows, which gives you greater flexibility in color grading during post-production, allowing you to achieve that distinct cinematic color look.
White balance adjusts the color balance in your videos so that white objects appear white, ensuring accurate colors under different lighting conditions. Although auto white balance can work well, manually setting your white balance according to your lighting situation (daylight, tungsten, etc.) prevents unwanted color shifts and maintains consistency throughout your shots.
Whether you're using a gimbal, a tripod, or your camera's built-in image stabilization, keeping your footage smooth is essential for that high-quality cinematic look. Handheld shots can be made cinematic with the right technique and stabilization gear, adding a dynamic yet smooth movement to your videos.

Neutral Density (ND) filters are invaluable tools for filmmakers aiming to maintain specific camera settings in diverse lighting conditions. They act as sunglasses for your camera, reducing the amount of light entering the lens without affecting the color of the image. This allows you to shoot with a wide aperture for shallow depth of field or adhere to the 180-degree shutter rule in bright environments without overexposing your footage. Variable ND filters offer the flexibility to adjust the level of light reduction, making them perfect for shooting in varying light conditions.
The composition of your shots is fundamental to cinematic video production. Employing techniques like the rule of thirds, where you divide the frame into nine equal segments and place your subject along these lines or at their intersections, can create more engaging and well-balanced scenes. Leading lines, such as roads or fences, can guide the viewer's eye toward the main subject, adding depth and perspective. Moreover, experimenting with different angles and heights can uncover unique and intriguing compositions that enhance the narrative.

Lighting plays a pivotal role in setting the tone and mood of your cinematic videos. Natural light is a powerful tool, especially during the golden hour—the period shortly after sunrise or before sunset, when the light is softer and warmer. This lighting can add a beautiful, dreamlike quality to your shots. In controlled environments, using additional lighting equipment like LED panels, reflectors, and diffusers can help you sculpt the scene to your liking, creating dramatic shadows or soft, evenly lit shots. The key is to observe how light interacts with your subject and the environment, and to use it creatively to support the story you're telling.
Often overlooked in favor of visual elements, sound design is critical in creating a truly immersive cinematic experience. High-quality, clear audio capture is essential, but the addition of ambient sounds, sound effects, and a carefully chosen soundtrack can elevate your video to new heights. Ambient sounds help ground the footage in its setting, while sound effects can heighten the impact of specific moments. The soundtrack, whether it's a dramatic score or subtle background music, should complement the mood and pace of the video, evoking the desired emotional response from the audience.

Color grading is the process of modifying the colors in your video to achieve a specific look or mood. This step can dramatically transform the aesthetic of your footage, from creating a warm, sun-soaked vibe to a cool, moody atmosphere. It's also a chance to ensure visual consistency throughout your project, matching shots from different times of day or various lighting conditions. Software like DaVinci Resolve or Adobe Premiere Pro offers extensive color grading tools, allowing you to manipulate colors, contrast, and saturation to realize your creative vision.
The journey to mastering cinematic video production is ongoing and evolves with every project. Practicing regularly, experimenting with different techniques, and learning from each experience are crucial steps in honing your skills. Analyze films and videos you admire to understand how they achieve their effects, and don't be afraid to try new approaches or ideas. Collaboration with others can also provide fresh perspectives and insights, further enriching your creative process.
Achieving a cinematic look in your videos is about understanding and creatively using your camera settings to control how your footage looks and feels. By mastering frame rate, shutter speed, ISO, depth of field, focus, color profiles, white balance, and stabilization, you can significantly enhance the quality and impact of your videos, regardless of whether you're shooting on a compact Sony camera or a professional cinema camera. Remember, the key to cinematic videos lies not just in the gear you use but in how you use it.
CINEMA LUTS PRO+
Turn your footage into cinematic masterpieces with our 1-Click solution LUTs. Over 30 handcrafted presets are waiting for you!
© cinema-luts.com
Imprint - Privacy Policy - Cookies - EAA - Blog
